博客用的是静态博客,至于为啥买了vps还用静态博客,就是先搞了博客后买的VPS,就不想再折磨自己了。静态博客是用cloudflare的page搭建的,用的是hugo,基本照搬了木木木木木大佬的模板。
复制一份Github源码,通过page直接链接到GitHub,在部署的时候要注意几个点:
[!构建参数]
构建命令:hugo
构建输出目录:/public
根目录:/
环境变量:HUGO_VERSION v0.128.0
对博客做了一些简单的个性化调整。
- 去除了评论功能;
- memos集成去除了广场模式;
- 涉及到的各种接口都改为了私有部署;
memos搭建
VPS上安装Docker
apt-get install docker
apt-get install dicker-compose
安装memos
由于我的博客模板中兼容的memos是旧版本的,所有我安装的时候指定了memos的版本。
docker run -d --name memos -p 5230:5230 -v ~/.memos/:/var/opt/memos neosmemo/memos:0.18.2
端口可自定义,打开防火墙对应端口
iptables -I INPUT -p tcp --dport 5230 -j ACCEPT
查看docker进程ID,设置服务自启动
docker ps -a//找到memos进程的CONTAINER ID
docker update --restart=always CONTAINER ID
这里安装就完成了,可以用ip:5230测试下访问,要注意的是浏览器会默认用https去访问,是访问不了的,可以改为http://ip:5230测试一下。为了更好的使用体验,需要再分配一个域名。
自定义域名
安装nginx
apt-get install nginx
在 /etc/nginx/conf.d/ 目录下创建 memo 的 nginx 配置:
cd /etc/nginx/conf.d/
touch memos.conf
然后去域名托管商那里增加DNS解析到VPS的IP。 现在网络访问都需要https了,我们需要为我们的域名配置一个SSL证书。这里我们使用certbot开源工具,可以自动化地申请、续期和部署Let’s Encrypt颁发的SSL证书。 首先关闭nginx服务和memos服务:
service nginx stop
docker stop memos
安装certbot:
apt-get install certbot
为自己的域名签发证书:
certbot certonly --standalone -d your.site
证书只有三个月有效期,我们需要让证书能够自动更新:
crontab -e
在打开的文件里最后加入如下代码:
0 3 1 * * certbot renew --quiet --pre-hook "service nginx stop" --post-hook "service nginx start"
这样每个月 1 号的凌晨三点执行证书重新签发任务,就可以保障自动续期了。
证书签发完成后,编辑我们前面新建的memos.conf文件,加入以下代码,注意修改你的自定义域名:
nano memos.conf
server {
    listen 443 ssl;
    server_name your.site;

    client_max_body_size 1024m;

    ssl_certificate      /etc/letsencrypt/live/your.site/fullchain.pem;
    ssl_certificate_key  /etc/letsencrypt/live/your.site/privkey.pem;

    ssl_session_timeout  5m;

    ssl_ciphers  HIGH:!aNULL:!MD5;
    ssl_prefer_server_ciphers  on;

    location / {
        proxy_pass http://localhost:5230;
        proxy_set_header Host $host;
        proxy_set_header X-Real-IP $remote_addr;
        proxy_set_header X-Forwarded-For $proxy_add_x_forwarded_for;
        proxy_set_header X-Forwarded-Proto $scheme;
    }
}
再启动nginx和memos服务:
service nginx start
docker start memos
这时就可以用https://your.site访问网站了。
memos美化
主要为修改字体为霞鹜文楷,在memos的设置-系统-自定义样式中加入如下代码:
/* 修改字体 */
body{font-family: "LXGW WenKai Screen", sans-serif !important;}
/* 修改Memo字号 */
.memo-wrapper .text-base { font-size: 0.95rem}
/* 修改代码块字号 */
.text-sm { font-size: 0.85rem; }
/* 隐藏 通知 选项卡 */
#header-inbox { display: none;}
/* 隐藏 个人资料 选项卡 */
#header-profile { display: none; }
/* 隐藏 探索 选项卡 */
/* #header-explore { display: none;} */
/* 隐藏 about 选项卡 */
#header-about { display: none; }
/* 修改编辑器字体为等宽 */
textarea { font-family: 'Courier New', Courier, monospace;}
/* 隐藏via memos */
body .flex.flex-row.justify-between.items-center > .text-gray-500.dark:text-gray-400 { display: none;}
/* share memos width */
.share-memo-dialog>.dialog-container { width: auto; }

/* sidebar */
.w-56 { width: 12rem;}
/* comment */
.pt-16 { padding-top: 2rem; }

blockquote{
    border: 1px solid #246ad1 !important;
    border-left: 4px solid #246ad1 !important;
    position:relative;
 }
 .blockquote-center{ background: none; }


#root main,#root header,#root aside {
    background-color: rgba(244 244 245 / 60%) !important;
    background: content-box !important;
    border-radius: 5px !important;
}

#root main,#root header,#root aside>div:nth-child(2),#root aside>div:nth-child(3)
{
    background-color: white;
    border-radius: 5px;
}

.px-2{
    background: content-box !important;
}
.border-r {
    border-right-width: 0px !important;
}

/* 移动端顶栏 */
.sm\:pt-2 {
    background: unset !important;
    --tw-backdrop-blur: auto !important
}
/* 顶栏文字 */
/* .text-gray-700{
    color: snow !important;
}*/

/* 设置滚动条的样式 */
::-webkit-scrollbar {
  width: 5px !important;
  height: 5px !important;
}
/* 滚动槽 */
::-webkit-scrollbar-track {
  background: #eee !important;
}
/* 滚动条滑块 */
::-webkit-scrollbar-thumb {
  border-radius: 5px !important;
  background-color: #ccc !important;
}
::-webkit-scrollbar-thumb:hover {
  background-color: rgb(247, 149, 51) !important;
}
在自定义脚本处加入如下代码:
function changeFont() {
  const link = document.createElement("link");
  link.rel = "stylesheet";
  link.type = "text/css";
  link.href = "https://cdn.staticfile.org/lxgw-wenkai-screen-webfont/1.7.0/lxgwwenkaiscreen.css";
  document.head.append(link);
};
changeFont()
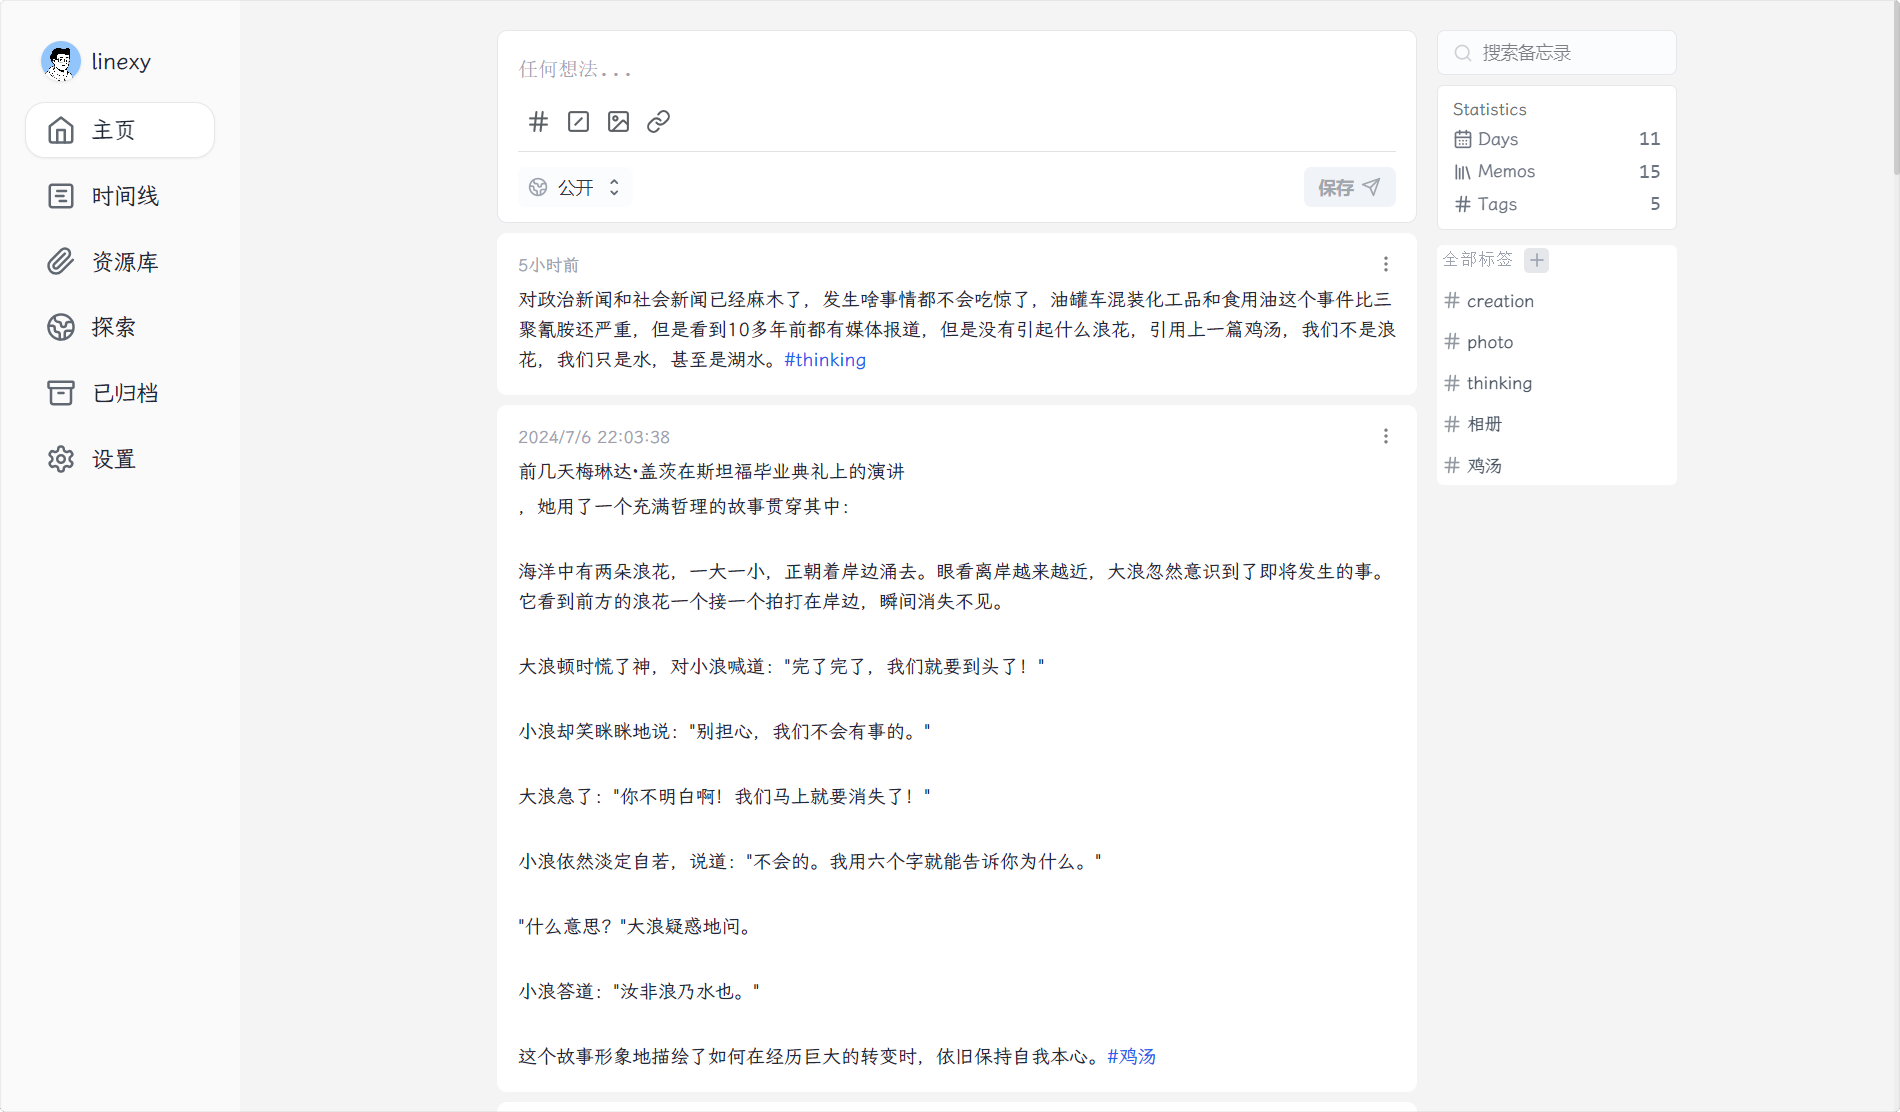
最终的效果:
Cloudflare R2免费存储
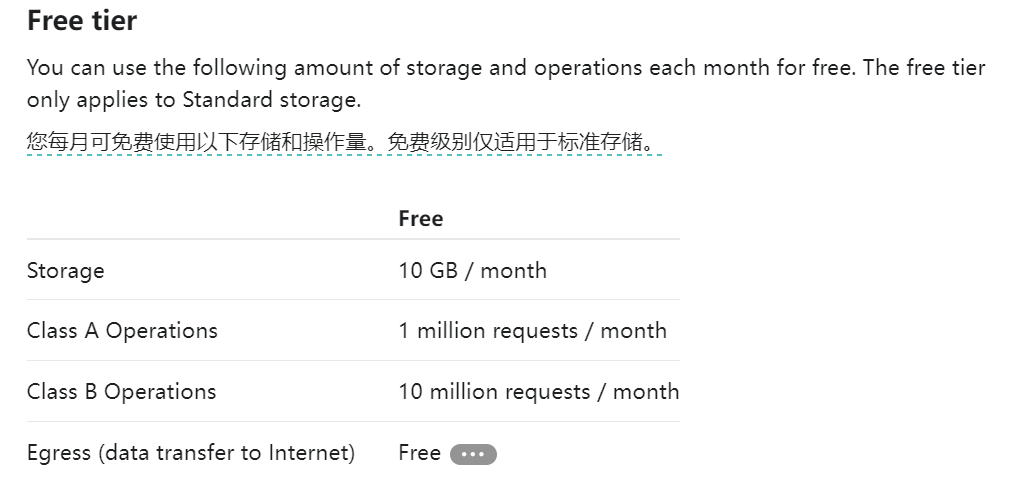
Cloudflare大善人,博客的图片存储可以直接使用R2对象存储,无限流量,10G免费存储,国内也可以访问。
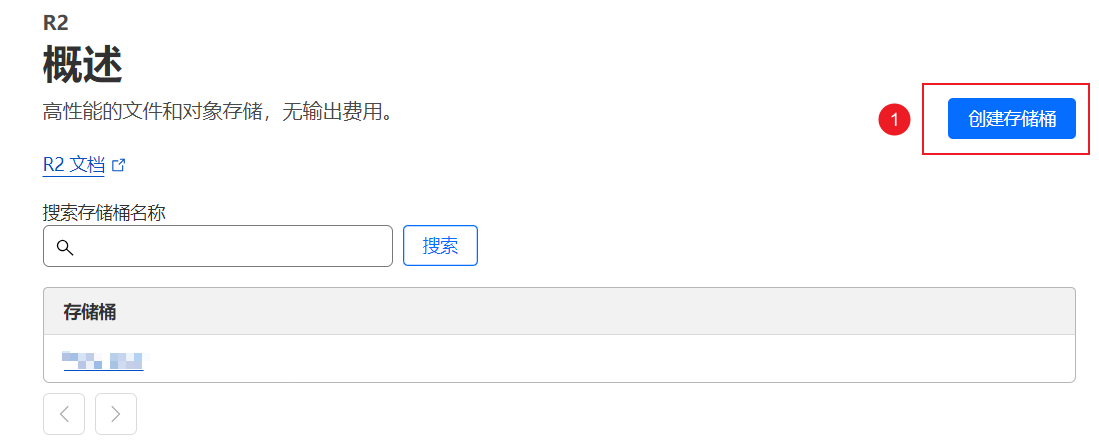
开通R2存储
开通R2存储需要绑定一张信用卡,只是用于验证用户,不会扣费,我是用的wildcard虚拟信用卡。开通服务后,就可以创建存储桶了。
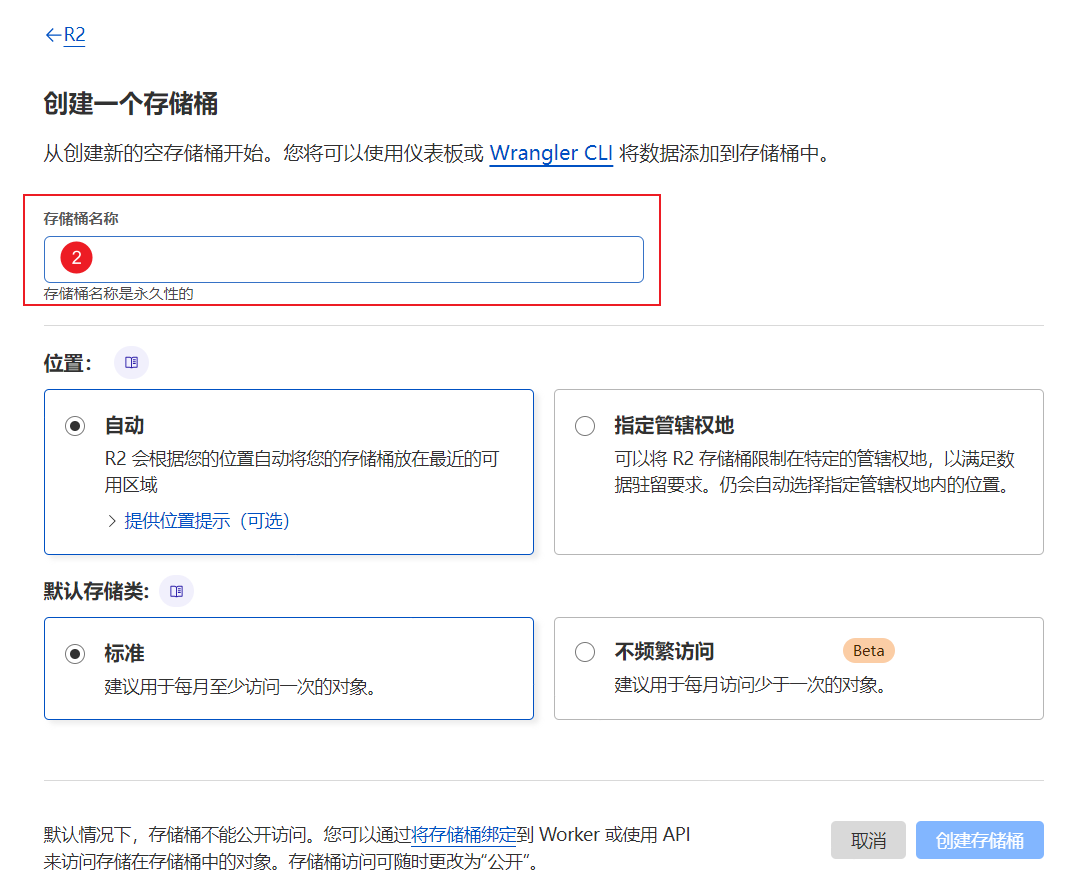
填写一个自定义的名称,位置选择自动,默认存储类选择标准。
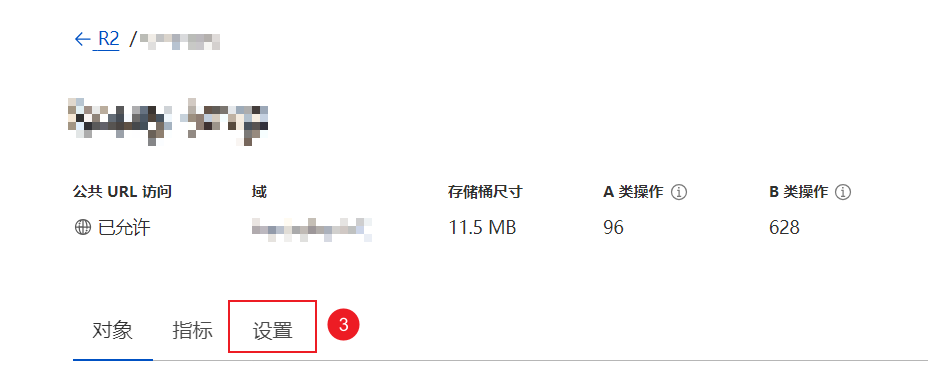
这样我们的存储桶就创建好了。到这里,就可以直接通过网页上传图片了。但为了图片上传方便和任何人都可以访问图片的链接,还需要做一些配置。
进入设置页面。
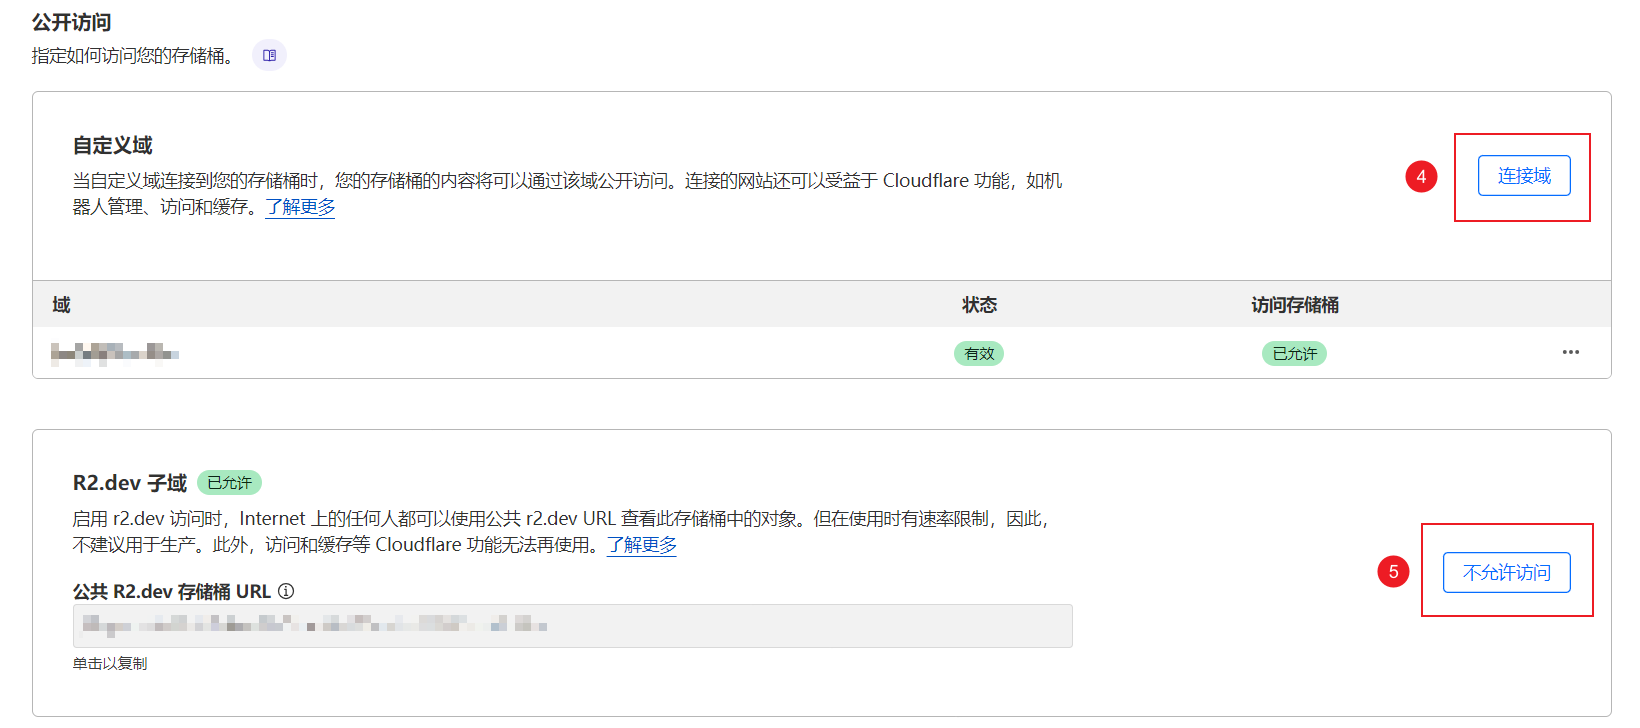
打开R2.dev子域,允许公共访问,并绑定一个自己的域名,如果域名也在cloudflare托管,那么会自动增加DNS规则并很快生效,在其他地方托管的域名可以参照页面说明执行。这一步完成,我们上传的图片就会生成一个url地址,访问这个地址就是我们对应的图片了。但使用起来不是很方便,所有我们继续下一步,绑定PicGo进行使用。
绑定PicGo
PicGo是一个开源的图床管理工具,支持主流的图床和对象存储服务,Cloudflare的R2存储提供S3的API接口,我们就可以配置到PicGo,方便我们日程使用。
回到我们存储桶的主界面,点击管理R2 API令牌 。
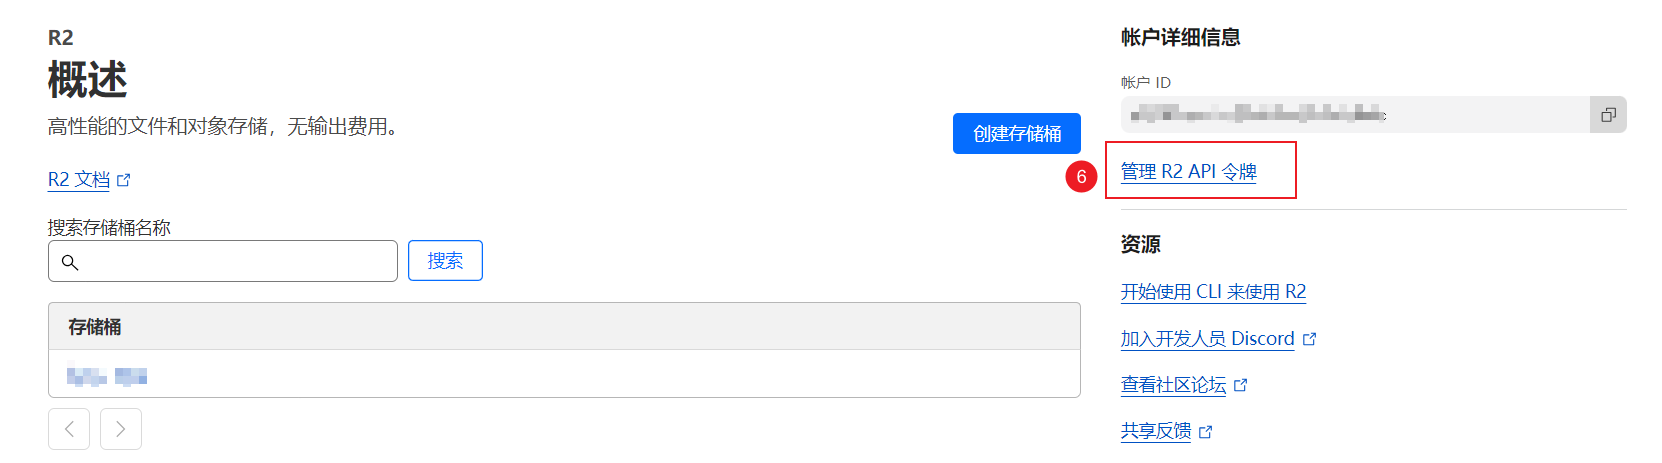
点击创建API令牌

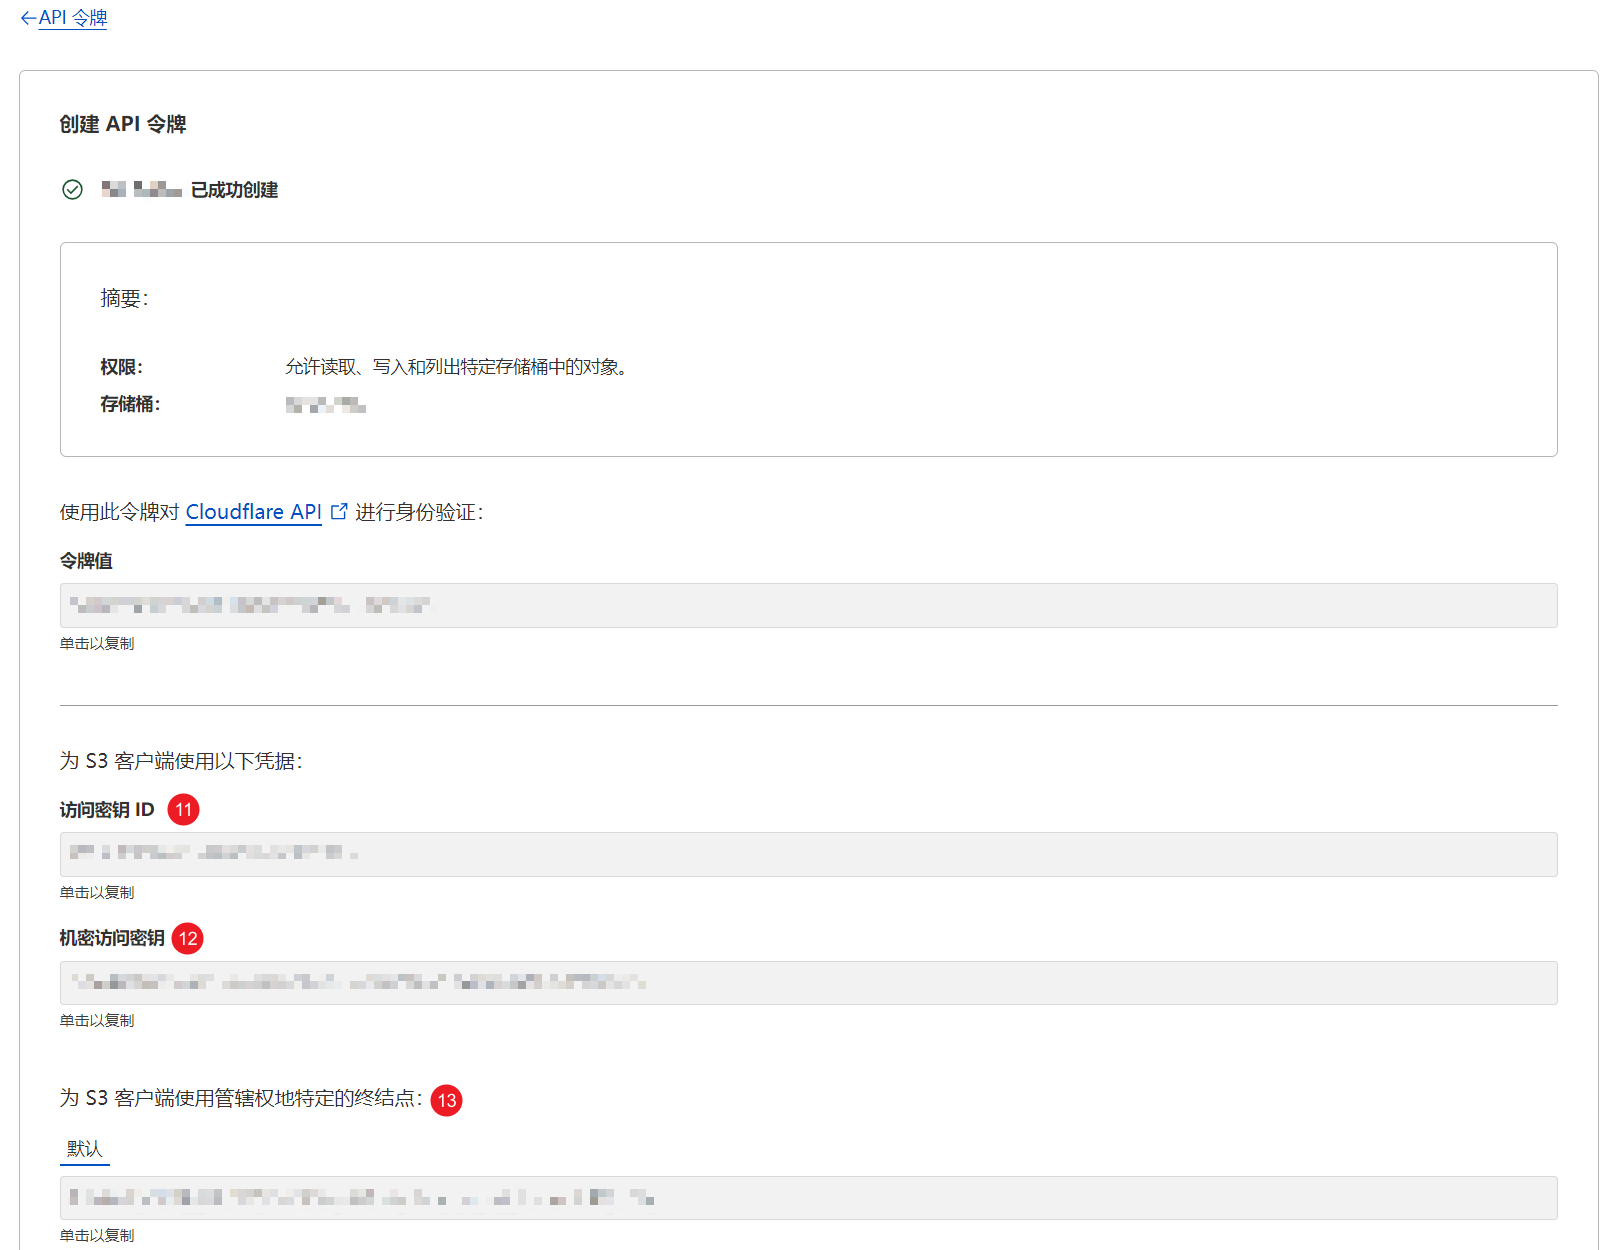
填写API令牌名称,权限选择对象读和写,并指定我们刚才建立的存储桶。
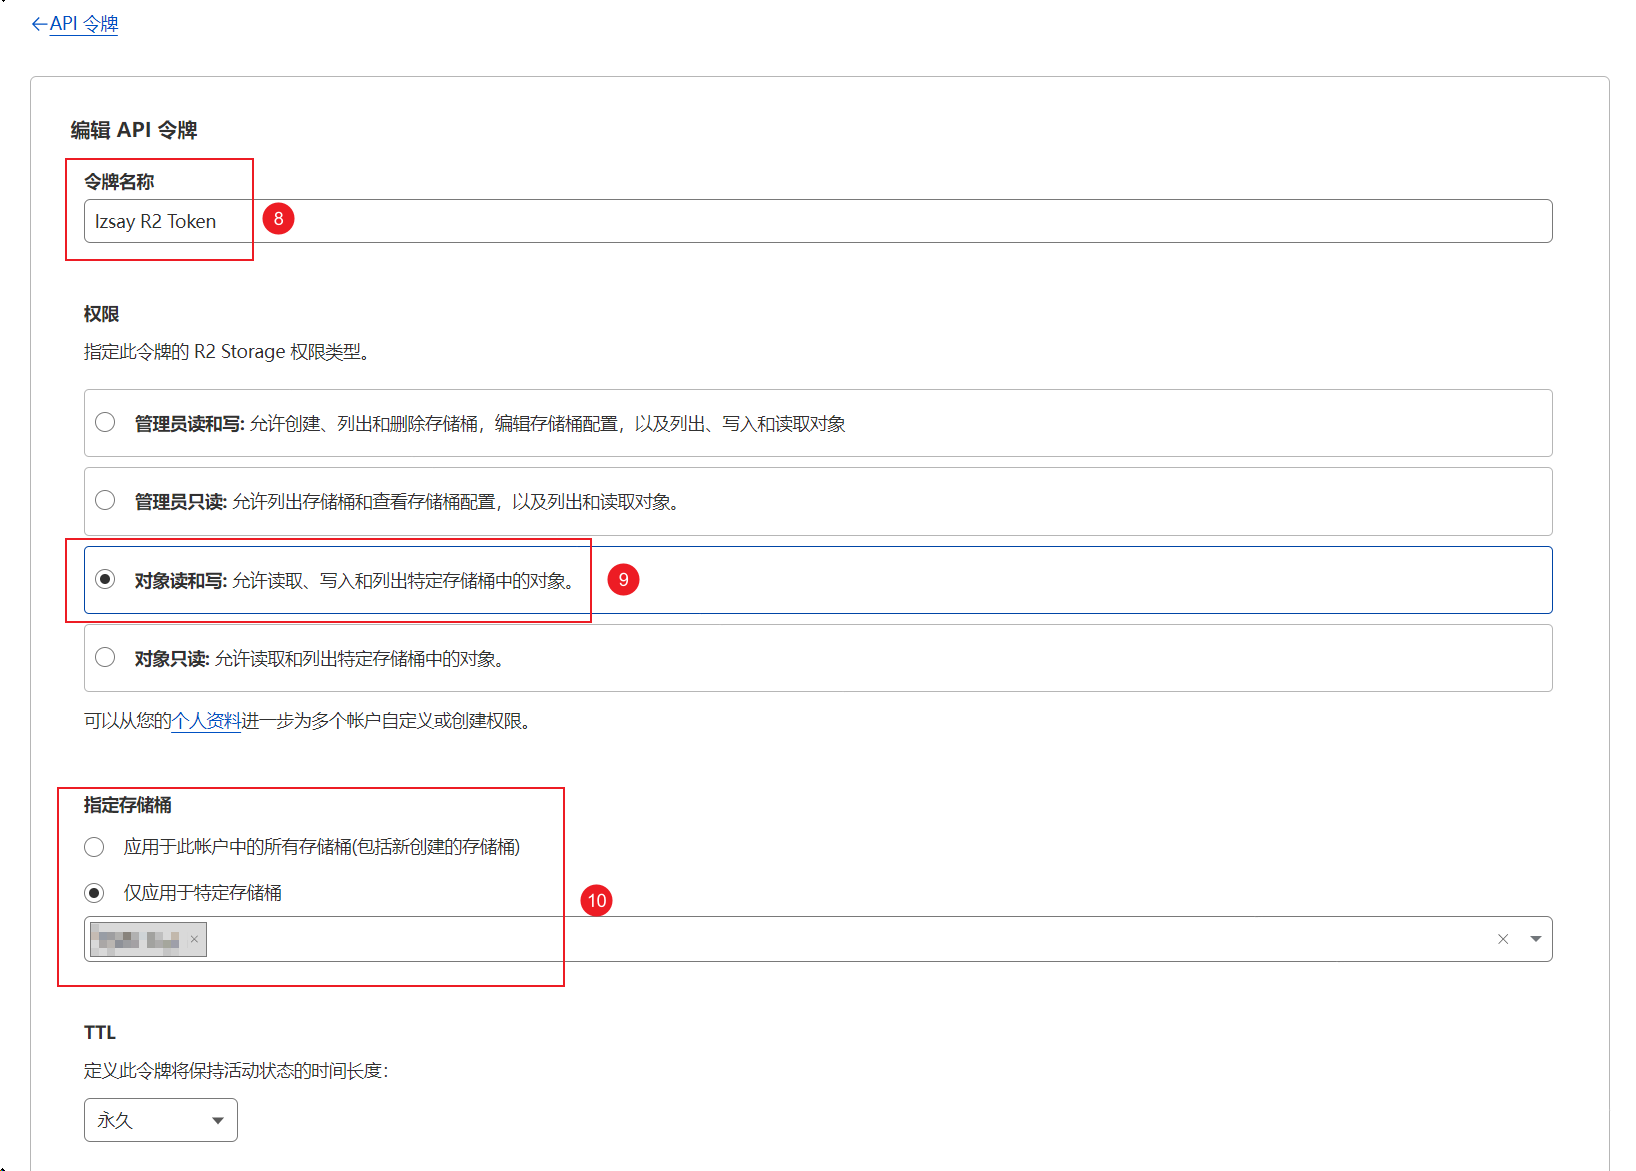
创建完成后就会显示相关的密钥,注意密钥只会显示一次,注意保存S3客户端的使用凭据。
打开我们下载的PicGo客户端,找到插件设置,搜索s3,安装s3插件。
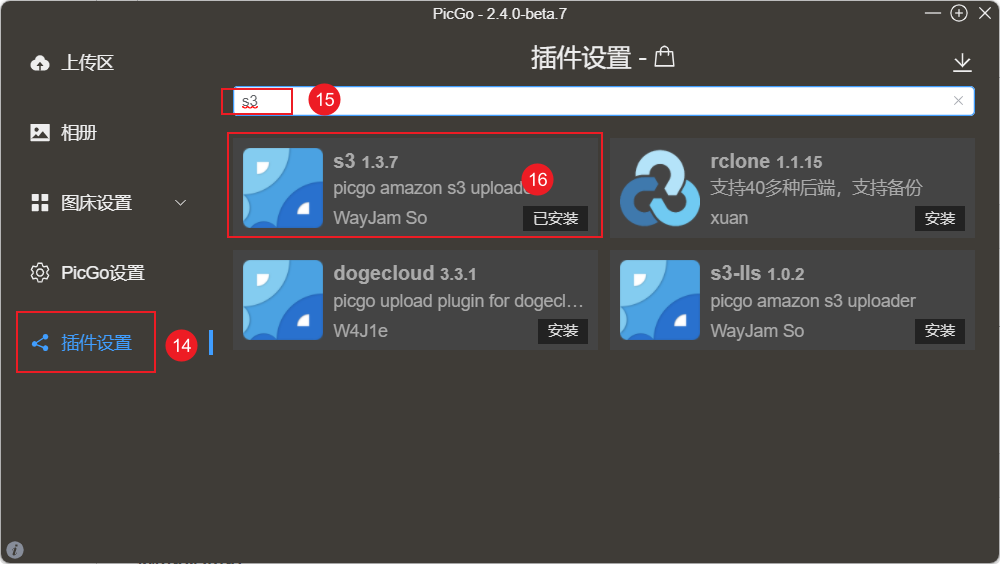
安装完成,进入配置界面。
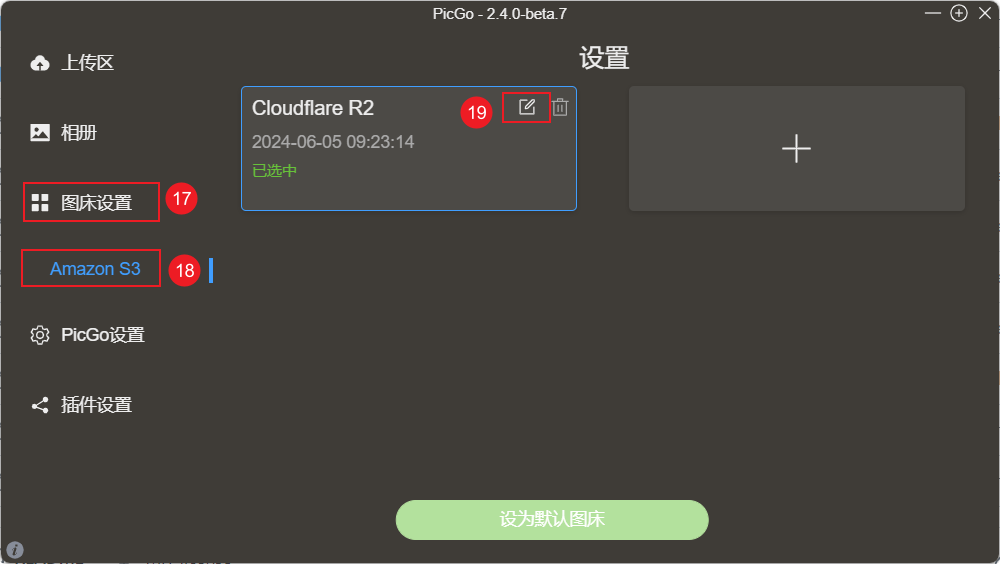
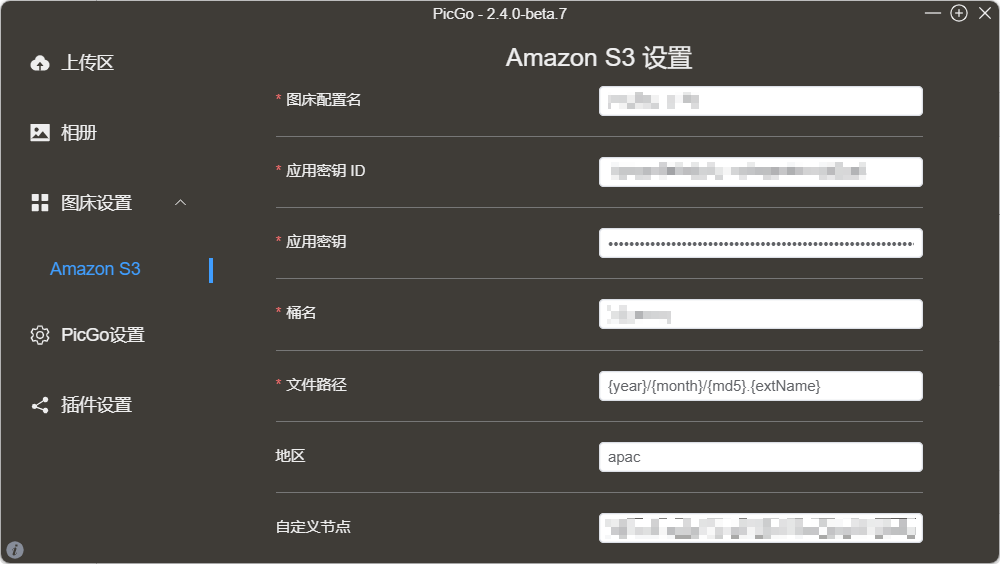
填写相关信息
- 图床名称:自定义名称
- 应用密钥ID:上述第11步的访问密钥ID
- 应用密钥:上述第12步的机密访问密钥
- 桶名:上述第2步的存储桶名称
- 文件路径:这个可以自定义,我用的是
{year}/{month}/{md5}.{extName} - 地区:默认
- 自定义节点:上述第13步的为 S3 客户端使用管辖权地特定的终结点中显示的地址
- 代理:默认
- 自定义域名:填写上述第4步或第5步的域名
- ForcePathStyle: yes
- 拒绝无效TLS证书连接:yes
- ACL访问控制列表:默认
- Bucket前缀:yes
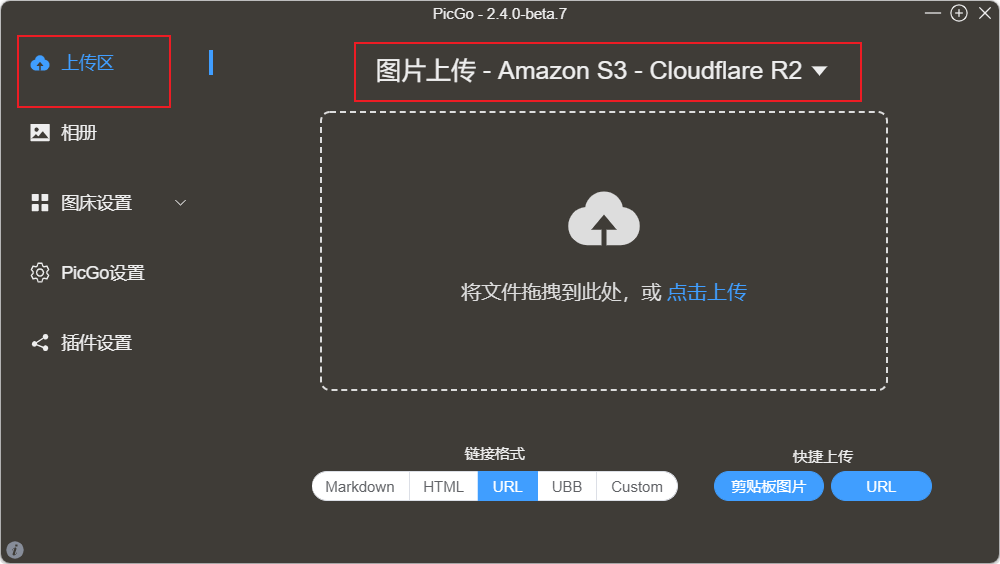
这样我们就配置好了PicGo,可以在上传区上传一张照片试一下,上传完成,PicGo支持直接复制图片链接,可以是多种格式。
到这里已经可以很方便的管理图床了,可是我写博客喜欢用Obsidian直接写,写完在传到blog,如果要插入图片还有先在PicGo传图片在粘贴到Obsidian,这一步还可以继续优化。
Obsidian粘贴图片自动上传
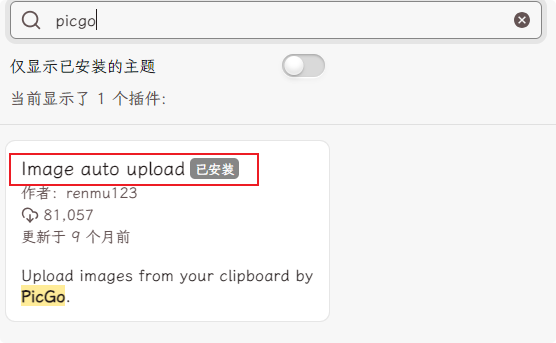
在OBsidian中添加插件
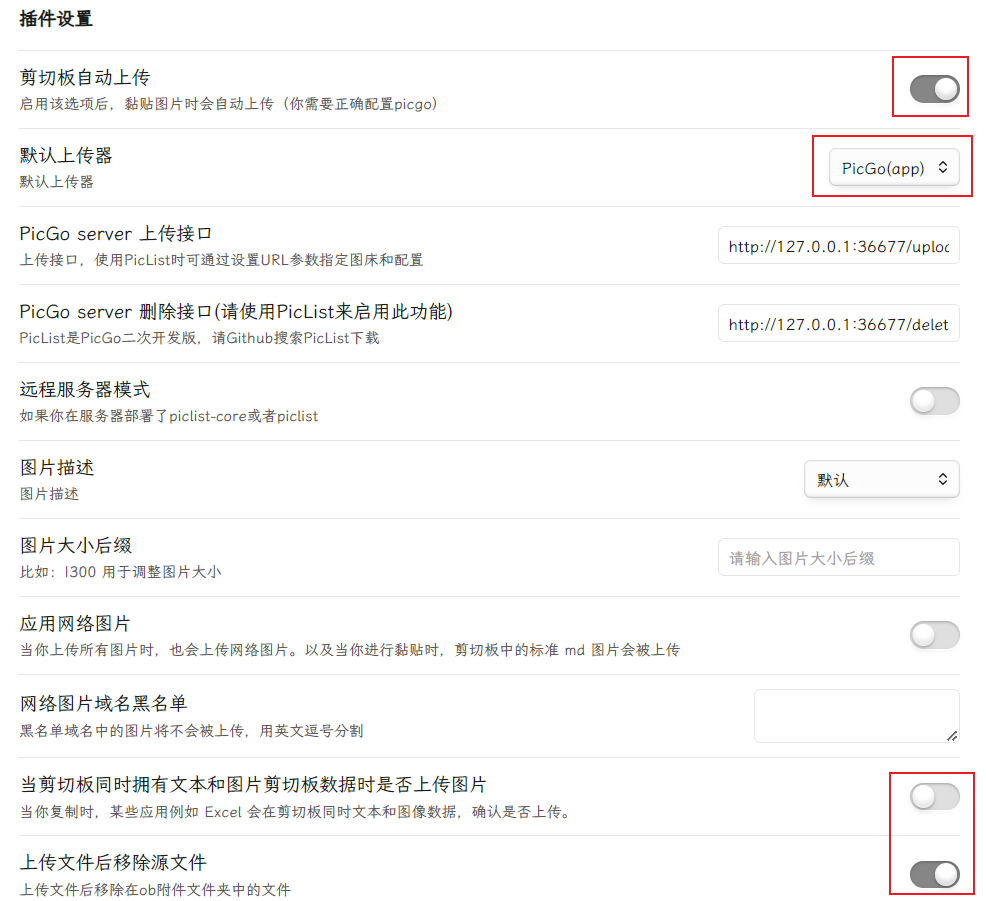
在插件设置中打开剪贴板自动上传,默认上传器选择PicGo(app),这样当粘贴图片到Obsidian中时会自动上传图片到图床。为了更好的体验,我打开了上传文件后移除源文件的选项。
这样在博客图文混排时就非常流程了。